The virus AutoRun.GUB

Thursday, August 13, 2009
If the virus is busy local Indonesian artist uses as a means of social engineering to trick potential victims in order to run a virus file, the virus that this is a film series inspired by Korea FullHouse. And information as Han Ji Eun is not branded but the escalator in the main series is. Characteristic of this virus is to create one additional drive with the name FullHouse Drive, if the virus has a goal to help popularize FullHouse film in Indonesia, a clear action to include this action in the less responsible. If you have a high ability programming, Vaksincom encourage you to maintain your integrity, because even if you are a programmer with great integrity who doubt will find very difficult job because integrity is a fixed price in the world of work.
Although not classified FullHouse new virus in Indonesia, but can not be denied if the spread of this virus is quite knowledgeable. The virus is made using Visual Basic programming language that in the action will make the drive in the Desktop, My computer and Control Panel is open if the image will show "Han Ji Eun" beautiful artist in the series Full House.


Norman Security Suite detects virus Full House as AutoRun.GUB (see picture 1)


Figure 1. Norman Security Suite detects virus FullHouse as AutoRun.GUB

FullHouse have the characteristics of which are as follows:
  • Have a file size of "168 kb" with the "Date Modified" 07-08-2009
  • File type "File Folder" which is actually the "Application" with a technique to manipulate registry
  • File extension. "Exe" is not visible because the virus is to add the string "NeverShowExt" in the registry so the file is not displayed extesions
  • Using the folder icon
  • Create additional drive with the name "FullHouse Drive" on the Desktop, My Computer and Control panel (see picture 2)

    Figure 2. AutoRun.GUB make the drive with the name FullHouse Drive
    • If you click on the drive will show the beautiful images of the artist in the serial Fullhouse (see figure 3)

    Figure 3. Photo of Han Ji Eun will be displayed when clicking on the Drive FullHouse

    Infection techniques
    1. If it works on the virus will create a master file in the directory C: \ RECYCLER (see figure 4)


    Figure 4. Master file is created by the virus Fullhouse

    2. Hide any folder on the Removable Disk (flash, external hdd, etc.) Virus is a duplicate folder name according to the folder that has been hidden with the goal lead on the user to activate the virus. (see picture 5)


    Figure 5. Make a duplicate folder to deceive the user

    Defense Engineering

    1. In order to keep the process running in the unwitting victims of viruses is to block regedit and Task Manager with a technique that is unique enough to run a second application in the background first so that if a user function error message will appear (see figure 6)

    Figure 6. Blocking the function registry windows

    2. To be able to run automatically when the computer is turned on, insert the string in the virus so that the registry will be active when entering the windows
            - HKLM, SOFTWARE \ Microsoft \ Windows \ CurrentVersion \ policies \ Explorer \ Run, Task Manager
            - HKCU, Software \ Microsoft \ Windows \ CurrentVersion \ Policies \ Explorer \ Run, Task Manager

    String registry file is called that is on a parent directory (see figure 7)
            = C: \ RECYCLER \ S-1-5-21-1202660629-412668190-725345543-500 \ smss.exe


    Figure 7. File parent who is active at the time of entry windows


    The technique Virus

    Make duplicate file viruses on removable media disks (flash, external disk) with the (hidden) folder and replace original file with the virus that has a folder icon so that users will think to open the folder but the file is actually a virus.

    How Overcoming Virus

    1. Virus scan file is located in the directory C: \ RECYCLER with antivirus that can detect this virus with both. Vaksincom use Norman Security Suite. (see figure 8)

    Figure 8, Use Norman Security Suite to detect and eradicate the virus FullHouse.

    2. After the scan has finished there is a virus file delete the file status (defered) means the file will be removed when the windows restart
    3. Click the Close button Clean ago at the time of the Norman Security Suite also will ask to restart the computer (see figure 9)


    Figure 9. Deffered Delete Norman is a feature to eradicate the virus and difficult to be naughty in the delete.

    4. Normal re-registry has been created by the virus open Notepad then copy the script below

    [Version]
    Signature="$Chicago$"
    Provider=Vaksincom Oyee

    [DefaultInstall]
    AddReg=UnhookRegKey
    DelReg=del

    [UnhookRegKey]
    HKCR, batfile\shell\open\command,,,"""%1"" %*"
    HKCR, comfile\shell\open\command,,,"""%1"" %*"
    HKCR, exefile\shell\open\command,,,"""%1"" %*"
    HKCR, piffile\shell\open\command,,,"""%1"" %*"
    HKCR, lnkfile\shell\open\command,,,"""%1"" %*"
    HKCR, scrfile\shell\open\command,,,"""%1"" %*"
    HKCU, Software\Microsoft\Windows\CurrentVersion\Explorer\Advanced,
    HKLM, SOFTWARE\Classes\exefile\DefaultIcon,,,""%1""
    HKLM, SOFTWARE\Classes\exefile,,,"Application"
    HKLM, Software\CLASSES\exefile\shell\open\command,,,"""%1"" %*"
    HKLM, Software\CLASSES\regfile\shell\open\command,,,"regedit.exe "%1""

    [del]
    HKLM, SOFTWARE\Microsoft\Windows\CurrentVersion\policies\Explorer\Run, Task Manager
    HKCU, Software\Microsoft\Windows\CurrentVersion\Policies\Explorer\Run, Manager Task
    HKCR, exefile, NeverShowExt
    HKCR, CLSID\{10020D75-0000-0000-C000-000000000000}
    HKLM, SOFTWARE\Classes\CLSID\{10020D75-0000-0000-C000-000000000000}
    5. Save with the name "repair.inf" select Save As Type to be All Files
    6. Repair.inf run with the right-click and select install
    7. Delete the file created by the virus with the following characteristics:
    8. File type "application"
    9. Extension "exe"
    10. Size 168 kb
    11. To simplify the process of searching the files of virus use "Windows Search" with the filter *. exe files that have a size of 168 KB and the date modified date 7/8/2008 (see figure 10)

    Figure 10. Remove virus file using windows search

    12. Then remove "FullHouse Drive" on the Desktop, My Computer and Contol Panel

    Figure 10. Remove fullhouse drive on the Desktop, My Computer and Contol Panel


    Recovery folder on the Flash Disk in the Hidden Past

    To show hidden folders back on the flash. Use the command "attrib" in the command prompt.
    1. Click "Start"
    2. Click "Run"
    3. Type "CMD", then press the "Enter"
    4. Move the directory to position Flash Disk drive, eg E command then type E: and press "enter"
    5. Then type the command attrib-s-h-r / s / d and press the "enter (see figure 11)

    Figure 11. Showing a hidden file 

    Congratulations to try and hopefully useful, keep blogging, thank you for the magazine chip.co.id

    Vista Reduction Resolution Monitor

    Wednesday, August 12, 2009
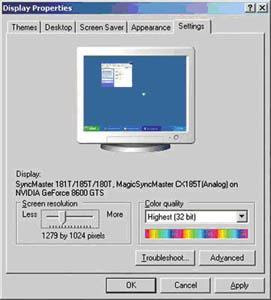
    Discusses the problems that Vista can not display the exact LCD resolution. As a solution, I remove Nvidia drivers and replace them with standard Microsoft drivers.


    No standard Resolution 1279 x 1024 is not available, but the difference with the standard resolution can be ignored.

    Diagnosis: From some of the suggestions I received, there has been no new ones. However, I actually was not too happy with the solution of the previously chosen to install the drivers that work previously. So, I shall go back to experiment with the monitor that is problematic with Vista. All possible solutions I've tried, as lead by the especial driver, use another card or cable, and install different versions of Vista. Unfortunately, all it does not help. Some suggestions are also recommended to include a new resolution in the nVidia menu. I also include the resolution of the original (native) LCD which is 1280x1024 with all options, but always get an error report. However, when entering the resolution of 1200x1000, "miracles happen" because of the resolution received by the driver.


    SOLUTIONS: I also raised the resolution to a resolution to reach the original 1279 x 1024. At this resolution, the horizontal is missing is not too significant and can be ignored. This, the original resolution was finally able to function with the nVidia driver.

    How to work fast with firefox

    Tuesday, August 11, 2009
    Here are some shortcuts that you can use in Firefox. If you remember the shortcuts below may accelerate the course "work" when you use Firefox.


    Ctrl + F
    Displaying the search box (at the bottom)

    Alt-N
    Do a search next

    ESC
    Close search box

    Ctrl + D
    bookmark site

    Ctrl + Q
    Opening a new tab

    Ctrl + K
    Go search box

    Ctrl + G
    The address bar

    Ctrl + =
    Enlarge font size

    Ctrl + --
    Reduce font size

    Ctrl + W
    Close tab

    F5
    Refresh web page

    Spacebar
    Scrolling down the page to

    Shift + Spacebar
    Roll up to the top of the page

    Download Video from Youtube.com

    Monday, August 10, 2009

    Youtube.com is one of the largest video site on the internet. Various types of video such as sports events, news and video tutorials you can download for free from there.

    To ease you in to download video from Youtube.com you can use the Youtube Downloader software.How to download: first select the video will be downloaded after a search of the url like this:

    http://www.youtube.com/watch?v=UOrcxwKAlOU
    Then paste the URL to the Youtube Downloader software and click the OK button for the download.

    After the download is complete you can play the video using the various free FLV player like wimpy Desktop FLV Player, Applian FLV Player, or using K-Lite Codec. I personally prefer to use K-Lite Codec because it can also be used to play almost all types of video files.

    You can also mengconvert FLV files to other video formats using the FLV Converter.
    Happy to try and hopefully useful, keep blogging.

    Disable Auto Run on a USB Drive

    Sunday, August 9, 2009
    Flash Disc affected by the virus is usually (not always) there is a file autorun.info in which there is a command to run the virus program. so, when the flash disc is inserted to the USB drive autorun feature is not automatically disable the Windows program will run in the background without any confirmation to the user.
    One way to reduce the risk of exposure to the virus is to disable autorun feature on the USB drive. There also is the following:
    1. Click Start - Run.
    2. Type gpedit.msc and press OK.
    3. Click on the User Configuration - Administrative Templates - System.
    4. 2x click on the Turn Off Autoplay.
    5. Click on the Enable option.
    6. At the option Turn off Autoplay on, select All drives.
    7. Click OK.
    8. Done.
    Note: there is only gpedit.msc in Windows XP Professional.

    I hope this tutorial can be useful for you all, keep blogging

    How Easy to Share Internet access

    You have two PCs. One of them, use the Windows Vista operating system, connected to the Internet. While the other PC is not connected to the Internet. Ciplus want it all PC can connect to the Internet.

    Currently you have two options for connecting a PC to the Internet. The first choice, Ciplus can install the new Internet connection to a PC is. But of course this option is less efficient. Cost required to create a new connection is certainly not small. Not to mention the levying of affairs.

    Options to two, Ciplus can share Internet access on one PC to another PC through the network. Share Internet access also can be done in two ways. The first way, you can use the Proxy.

    You need to install Proxy software on a PC connected to the Internet. Only in the PC, set in Internet Options so that it leads to the Proxy. This setting is in the [Start]> [Control Panel]> [Network and Internet]> [Internet Options]. In the Internet Options window, select the tab [Connections] and click [LAN Settings]. Check on [Use a proxy server for your LAN (These settings will not apply to dial-up or VPN connections)]. Then fill in the name of the PC or the IP address of the PC has access to the Internet Address column. Do not forget to fill in its port in the Port. Click [OK] twice and after that, you can access the Internet from any PC.

    Alternatively, if you do not want to be bothered to install Proxy, is a feature you can utilize to share Internet access in Windows Vista. How, follow the steps below.
    1. Click [Start]> [Control Panel]> [Network and Internet]> [Network and Sharing Center].
    2. In the Tasks panel which is located on the right, select the option [Manage Network Connections].
    3. In a new window that appears you will see that there is a series device in your PC. Right-click on the device which is the source Feed Internet access, and select [Properties].
    4. In the Properties window, select the tab [Sharing].
    5. Give a check mark in front of the option [Allow other network users to connect through this computer's Internet Connection].
    6. In the Home networking connection, select the type of network connection that you use, whether the form of [Local Area Connection] or [Wireless Network Connection].
    7. If you want the connection terbetuk each time a request from a client PC, please also check the options in front of [Establish a dial up connection whenever a computer on my network attempts to access the Internet].
    8. Click the button [Settings] on the new course.
    9. Give a check mark in front of the service options that will be divided pakaikan. If you want to share all types of service use on the Internet, you can check all the options in front of the service.
    10. Press [OK] to save all the changes you made.
    After that make sure all the settings, the IP of your PC connected to the Internet suffixes ber 1. So eg you use 192.xxx IP, you must set your PC is connected to the Internet with 192.168.0.1.

    Hopefully useful to you, and please read carefully to know what useful, keep blogging
    While in the other PC (client), you must set its IP in a network gateway and directed with his DNS to IP of PC connected to the Internet.

    Term in IP Command

    Below are the commands associated with the network. To make these commands you must enter the MS DOS Prompt.

    ipconfig / all
    Showing the connection configuration information, such as Host Name, Primary DNS Type, Ethernet LAN Adapter.

    ipconfig / displaydns
    Showing DNS Cache.

    ipconfig / flushdns
    Removing DNS Cache

    ipconfig / release
    "Removing" all connection IP Address.

    ipconfig / renew
    Create a new IP Address for a particular adapter.

    ipconfig / registerdns
    Do refresh DNS and re-register DNS connection.

    ipconfig / showclassid
    Showing information DHCP Class.

    ipconfig / setclassid
    Modify DHCP Class ID

    control netconnections
    Displaying Network Connection.

    ping
    Example: ping-www.facebook.com
    Make connections to the test site www.klik-kanan.com. The few% loss to its food the better connection.

    tracert
    IP Address displays the information route.

    netstat
    Displays connection information TCP / IP is currently active.

    route
    Show the local route.

    hostname
    Displays the name of the computer.

    This tutorial provides a nice benefit for those who read it, keep blogging.

    Create Shortcut To Hibernate

    Hibernate in Windows is one of the features that is quite interesting. With the hibernate then when you open the computer again, Windows will not start the process of booting from the start but more directly to the position in which all applications and documents that the last time you open.

    To activate hibernate from the menu can Turn Off Computer, press the Shift key and click on the menu Hibernate.


    To expedite the process hibernate you can create shortcuts as follows:
    1. Right-click on the Desktop.
    2. Click the new menu - Shortcut.
    3. In the Type of location of the items charged with:
    4. Click the Next button.
    5. Give the shortcut a name, such as Hibernate.
    6. Click the Finish button.
    Hopefully useful and keep blogging.

    How to introduce Web Site

    After you finish designing and uploading a file does not mean our job is complete. What does it mean we have a website but there are people who do not know? Nah, that we are the website there are several ways that we can do, namely:

    1. Submit to search engines
    Search engines use a lot of people to get the address of a site based on keywords that they enter. On the internet there are now hundreds and even thousands of Search engines ranging from a mock up of large, professionally managed. You do not need to register your web search engine to all, but just to list some of the famous engine searach of Indonesia and overseas. For registration there is a difference between a search engine with other search engines. The first, at the time you register on a search engine you need to enter a keyword and a short description about your web site. Search For example Indonesia, Catcha, etc.. The second, when you sign up just shows the URL of your website. After that search engines will "crawl" to the web and you find the keyword and description meta tag is located on your web page. For that before uploading, make sure that you have been writing the meta tags correctly. (If you do not know about meta tags, see the HTML source code on the main page this web site, the file called index.shtml)

    2. Participate in Banner Exchange

    This is another way to introduce our web. Following the exchange of banner you are required to display a banner other people (who become members) on your site. The banner and you will be shown on other sites. The size of the banner that is used is usually 468 x 60 pixels. To create a banner you can use Adobe PhotoShop, and to make animasinya you can use Ulead Gif Animator.

    Shortcut to Shutdown, Restart and Logoff

    To accelerate the shutdown you can create a shortcut on the desktop. How:
    1. Right-click an empty area on the desktop and select New - Shortcut.
    2. At the command line type c: \ windows \ rundll32.exe user, exitwindows.
    3. Click next and name the shortcut.
    4. Finally click Finish.
    To restart the shortcut you need to c: \ windows \ rundll32.exe user, exitwindows with C: \ WINDOWS \ RUNDLL.EXE user.exe, exitwindowsexe.

    To restart the shortcut you need to c: \ windows \ rundll32.exe user, exitwindows with C: \ WINDOWS \ RUNDLL.EXE shell32.dll, SHExitWindowsEx 0.

    Adjust the target in Windows Explorer

    When you click Windows Explorer icon on the Start - Programs that by default it opens the drive is C. Actually you can just change the target, eg into C: \ Data \ MS Word, then you should do is right click the shortcut icon and move to the Shortcut tab. Projected change in the section as follows:

    "C: \ windows \ explorer.exe / n, / e, C: \ Data \ MS Word"

    If you want to open a folder as root then add / root, so the command to be as follows:

    "C: \ windows \ explorer.exe / n, / e, / root, C: \ Data \ MS Word"

    Now if you click on the shortcut will be opened by Windows Explorer folder is C: \ Data \ MS Word.

    Start Menu of Windows XP such as Windows Vista

    Windows Vista has been released since a few years ago but still many people who still prefer to use Windows XP. The main reason may be because the hardware specifications required to run Windows Vista higher.

    If you want to use Windows XP but not "feel" the look and functionality such as start menu in Windows Vista, you can use the two free software the following:

    ViStart


    Download: ViStart Beta

    Vista Start Menu


    Download: VistaStartMenu

    Adding Statistics On Website

    You want to know the number of visitors to your web? Want to know which browser or use your web page the most views? How easy. You can use the statistics that have been provided by many providers. One of the most famous is www.hitbox.com. This paper will explain how to add the statistics on the web page and what information can be obtained. In this example we will use HitBox.

    To get the service, as you usually need to register first. STEP 2 Fill in and follow that have been provided. You'll then get the code that you need to add on your web page. There are two types of code, the code that is placed on the main web page and you put the code on another page (not on the main page). Now copy the code to the pages you want to observe the statistics.
    1. Well, after a web page that has been disisipi code from HitBox are uploaded, you can find various info such as:
    2. Page Views, the number of pages viewed.
    3. Pages Per Visitor seen, the number of pages viewed by each of your web visitors.
    4. Most requested Pages, the most page views.
    5. Average Depth of Pages, shows how the number of pages viewed by visitors to your web. In other words, a visitor to see how many web pages.
    6. Browser Version, the browser used by visitors to your web, can Internet Explorer, Mozila Firefox, Opera, etc..
    7. Resolution monitor, menujukkan resolution monitor used to view your web.
    8. Referring URLs, indicate from which they come to your web, if the link from another web, search engines, bookmarks, or the other.
    9. Time spent on Site, shows how many seconds, minutes or hours-kah the visitors are on your web.

    Tips from the Stop the DOS Prompt

    To stop the process (application and service) that is running on Windows I believe you often do so from the Windows Task Manager.


    Besides these ways, there are other ways you can do that is through the DOS Prompt. Way is as follows:
    1. Go to the dos prompt by typing cmd from the Start menu - Run.
    2. Write a tasklist and hit enter, it will appear the list of processes running, such as the image below:
    3. Find the name you want to stop, and search its PID number.
    4. Suppose you want to stop the Firefox program, then write: tskill 1844, and press enter.
    5. Done

    Hide The Start Button Start Killer 3.0

    Start Killer is a small software to hide the Start button, located in the bottom left corner. When the software is running, Start button akan "disappear" from the taskbar and you will get a little extra space on the taskbar.

    Although there is no Start button, you can still access the Start menu by pressing the Ctrl key + ESC or Windows key.

    To display the Start button again, you should close the Killer Start by clicking the right icon on the Start Killer systray menu and click Exit.
    Download Start Killer 3.0.

    Only Showing Icon On Taskbar

    By default the taskbar displays the application icon and caption which is active (in the form of a button). With the following tips you can remove the caption and just show iconnya only. That way you still have enough space if at the same time you run many applications.


    1. Run the registry editor, I click Start button - Run. Type regedit and press OK.
    2. Go to the key HKEY_CURRENT_USER \ Control Panel \ Desktop \ WindowMetrics
    3. Panel on the right search string value MinWidth ago to be change the value -255. If the string value is not there, you should make it by clicking right and select New - String Value.
    4. Close the registry.

    Hide Control Panel Icon

    One way to prevent others from changing settings or configuration on your computer is to hide the icon / applet in the Control Panel. Way is as follows:

    Go to go to the registry key:

    Key: HKEY_CURRENT_USER \ Control Panel \ do not load
    Value Name: xxxx
    Data Type: REG_STRING


    Xxxx value depends on what the icon will be hidden. Suppose you want to hide the System icon, then filled with xxxx sysdm.cpl.

    Below is a description of the Control Panel icon:

    Accessibility Options = access.cpl
    Add Hardware Wizard = hdwwiz.cpl
    Add or remove programs = appwiz.cpl
    Display Properties = desk.cpl
    Game Controllers = joy.cpl
    Internet Properties = Inetcpl.cpl
    Mouse Properties = main.cpl
    Network Connections = ncpa.cpl
    ODBC Administrator = odbccp32.cpl
    Phone and modem Options = telephon.cpl
    Power Options = powercfg.cpl
    Region and Language Options = intl.cpl
    Sound and Audio Devices = mmsys.cpl
    Speech Properties = sapi.cpl
    System Properties = sysdm.cpl
    Date and Time Properties = timedate.cpl
    Users Accounts = nusrmgr.cpl.

    How do I create a blog at blogspot

    After we arrive in Blogger.com, you will see picture like shown above. Now, follow my instruction.
    1. Click an arrow sign, inscribed with “CREATE YOUR BLOG NOW”
    2. Complete the ‘e-mail address’ form, with your own e-mail address (of course with the valid one).
    3. Rewrite your e-mail address in form ‘retype e-mail address’
    4. Type the password as you wanted to. Type it in form, ‘enter a password’
    5. Retype your password in form ‘type password again’
    6. Type the password as you wanted to. Type it in form, ‘enter a password’
    7. Retype your password in form ‘type password again’
    8. Type the word which has shown, in form ‘word verification’. Click the white little square beside the sentence, ‘I accept the Terms of Service’.
    9. Click an arrow sign inscribed with “CONTINUE”
    10. Write the title of your blog that you desire (you can change it later) in form ‘Blog Title’
    11. Type the name of your site in form ‘Blog Address (URL)’ .
    12. Type verification word which shown in form ‘word verification’. After that, click an arrow image inscribed with word, ‘CONTINUE’.
    13. Choose one template that you wanted to (You can change it later, if you want), then click again an arrow sign inscribed with word ‘CONTINUE’.
    14. Wait a moment. After you meet a sentence ‘Your blog has been created’. Click an arrow sign (again) which inscribed with “BEGIN POSTING’. Feel please to fill up your blog with everything you want to. After you finish with your first posting, just click the sentence, ‘PUBLISH YOUR POSTING’, Please write What you want, if being finished then click of the publish button.
    Congratulations to try and hopefully useful. keep blogging.